Kitchen Island Size: Essential Guidelines for Optimal Space

Creating a cozy and relaxing outdoor living area can transform your backyard into a personal retreat where you can unwind and enjoy the beauty of nature. With thoughtful design and the right elements, you can make your outdoor space inviting and comfortable. Here are some tips for creating a cozy and relaxing outdoor living area.
1. Choose Comfortable Seating
- Plush Cushions: Invest in outdoor furniture with plush cushions that offer comfort and support. Opt for weather-resistant fabrics to ensure durability.
- Variety of Seating: Include a variety of seating options such as sofas, lounge chairs, and hammocks to accommodate different relaxation styles.
2. Incorporate Soft Lighting
- String Lights: Hang string lights across your patio or garden to create a warm and inviting atmosphere. They add a magical touch and are perfect for evening relaxation.
- Lanterns and Candles: Use lanterns and candles to add soft, ambient lighting. Battery-operated or solar-powered options are safe and convenient.
3. Add Cozy Textiles
- Outdoor Rugs: Place outdoor rugs under seating areas to add warmth and define the space. Choose rugs that are durable and easy to clean.
- Throw Blankets and Pillows: Add throw blankets and pillows to your seating areas for extra comfort. They are perfect for chilly evenings and add a touch of coziness.
4. Create Privacy
- Privacy Screens: Use privacy screens or trellises to create a sense of seclusion. They can also be used to support climbing plants for added greenery.
- Tall Plants and Hedges: Plant tall shrubs or install hedges to create natural barriers. This adds privacy and a lush, green backdrop to your space.
5. Incorporate Natural Elements
- Greenery: Add plenty of plants and flowers to your outdoor area. They bring life and color to the space and help create a calming environment.
- Water Features: Include a water feature such as a small fountain or pond. The sound of flowing water adds tranquility and masks unwanted noise.
6. Use Functional Decor
- Multi-Purpose Furniture: Choose furniture that serves multiple purposes, such as storage benches or tables with built-in coolers. This maximizes functionality without cluttering the space.
- Outdoor Storage: Use stylish storage solutions like wicker baskets or wooden crates to keep your outdoor area tidy and organized.
7. Define Zones
- Separate Areas: Create separate zones for different activities, such as lounging, dining, and cooking. This helps organize the space and makes it more functional.
- Outdoor Rugs and Planters: Use outdoor rugs and planters to visually define different areas. This adds structure and helps the space feel more cohesive.
8. Add Personal Touches
- DIY Decor: Incorporate DIY decor projects to add a personal touch. Handmade items like painted pots, custom cushions, or crafted lanterns can make the space uniquely yours.
- Favorite Items: Include items that reflect your personal style and interests, such as a favorite piece of art, a cozy hammock, or a unique fire pit.
9. Seasonal Adjustments
- Seasonal Plants: Change your plant selections with the seasons to keep your outdoor space vibrant and fresh. Seasonal flowers and foliage can add color and interest year-round.
- Weather-Appropriate Decor: Adjust your decor to suit the weather. Use lightweight fabrics and fans in the summer, and add heaters and heavier blankets in the winter.
10. Maintain Cleanliness
- Regular Cleaning: Keep your outdoor living area clean and well-maintained. Regularly sweep, dust, and wash surfaces to keep the space inviting.
- Pest Control: Implement pest control measures to keep your outdoor area free of bugs and critters. This ensures a comfortable and relaxing environment.
Creating a cozy and relaxing outdoor living area is all about combining comfort, functionality, and personal style. By incorporating these tips, you can transform your outdoor space into a serene retreat where you can unwind and enjoy the outdoors.
So, if you’re wondering, “What are some tips for creating a cozy and relaxing outdoor living area?”, these strategies provide a comprehensive guide to designing a space that is both inviting and functional. Enjoy your outdoor oasis with friends and family, or simply relax and soak in the tranquility!
Creating an outdoor space that is both beautiful and functional can significantly enhance your enjoyment and use of the area. By thoughtfully organizing your outdoor space, you can maximize its functionality and create a versatile environment for relaxation, entertainment, and more. Here are some effective tips on how to organize your outdoor space for maximum functionality.
1. Define Zones for Different Activities
- Seating Area: Designate a comfortable seating area for relaxation and socializing. Use outdoor sofas, chairs, and coffee tables to create a cozy nook.
- Dining Area: Set up a dining area with a table and chairs for outdoor meals. Consider a foldable or extendable table to save space when not in use.
- Cooking Zone: If you enjoy outdoor cooking, create a dedicated cooking zone with a grill, prep table, and storage for utensils and supplies.
2. Use Multi-Functional Furniture
- Storage Benches: Incorporate storage benches that double as seating and storage for cushions, toys, or gardening tools.
- Convertible Tables: Use tables that can be adjusted in height or folded away when not needed. This flexibility helps save space and adapt to different needs.
- Ottomans: Choose ottomans that can serve as extra seating, footrests, or even side tables.
3. Incorporate Vertical Storage Solutions
- Wall-Mounted Shelves: Install wall-mounted shelves to store plants, decor, or outdoor essentials. This keeps the ground clear and maximizes vertical space.
- Hanging Baskets: Use hanging baskets to store small items or plants. They add greenery and keep things organized without taking up floor space.
- Pegboards: Install pegboards on walls to hang tools, hoses, or other outdoor equipment. This keeps items easily accessible and neatly arranged.
4. Optimize Traffic Flow
- Clear Pathways: Ensure there are clear pathways for easy movement throughout the space. Avoid placing furniture or decor in ways that obstruct the flow.
- Strategic Layout: Arrange furniture in a way that naturally guides people through the space. Use rugs or stepping stones to define paths and direct traffic.
5. Smart Storage Solutions
- Outdoor Cabinets: Use weather-resistant cabinets or storage units to keep outdoor items organized and protected from the elements.
- Storage Boxes: Place storage boxes or bins in strategic locations to store cushions, gardening tools, or outdoor toys. Choose boxes that can double as tables or seating.
- Hooks and Racks: Install hooks and racks on walls or fences to hang tools, hoses, or outdoor gear. This keeps items off the ground and easily accessible.
6. Incorporate Flexible Lighting
- String Lights: Hang string lights to create a warm and inviting atmosphere. They are versatile and can be draped over trees, fences, or pergolas.
- Solar Lights: Use solar-powered lights along pathways, in planters, or around seating areas. They are energy-efficient and easy to install.
- Lanterns: Place lanterns on tables or hang them from hooks to add ambient lighting. Choose battery-operated or solar-powered options for convenience.
7. Use Outdoor Rugs
- Define Areas: Use outdoor rugs to define different zones, such as seating, dining, or play areas. Rugs add comfort and help organize the space visually.
- Add Color and Texture: Choose rugs in colors and patterns that complement your outdoor decor. They can add warmth and style to the space.
8. Add Greenery and Decor
- Potted Plants: Use potted plants to add greenery and natural beauty. Arrange them in clusters to create focal points and add depth.
- Vertical Gardens: Install vertical gardens or trellises to maximize planting space and add visual interest.
- Outdoor Art: Hang outdoor-friendly art or decor on walls or fences to add personality and charm to the space.
9. Seasonal Adjustments
- Winterizing: Prepare your outdoor space for winter by storing furniture indoors or using protective covers. Clear away seasonal decor and store it properly.
- Spring Refresh: In spring, clean and inspect your outdoor space. Refresh decor, add new plants, and make any necessary repairs.
10. Personal Touches
- Custom Decor: Add personal touches like custom-made cushions, DIY planters, or handmade art. Personalized decor makes the space feel more inviting and uniquely yours.
- Comfort Items: Include comfort items like blankets, pillows, and outdoor heaters to make the space cozy and usable year-round.
Organizing your outdoor space for maximum functionality involves thoughtful planning and creative solutions. By defining zones, using multi-functional furniture, and incorporating smart storage and lighting, you can create an outdoor area that is both beautiful and practical.
So, if you’re wondering, “How do I organize my outdoor space for maximum functionality?”, these tips provide a comprehensive guide to making the most of your outdoor area. Enjoy a well-organized, functional space that enhances your outdoor living experience!
Creating a small patio that feels spacious and inviting can be a delightful challenge. With thoughtful design and strategic choices, you can maximize your outdoor space and make it a cozy retreat. Here are some effective tips on how to make a small patio look more spacious and inviting.
1. Choose the Right Furniture
- Compact Furniture: Opt for compact, multi-functional furniture that doesn’t overwhelm the space. Folding chairs, stackable stools, and benches with storage are great options.
- Transparent Materials: Use furniture made of transparent materials like acrylic or glass to create a sense of openness. These materials allow light to pass through, making the area feel larger.
2. Utilize Vertical Space
- Vertical Gardens: Install vertical gardens or hanging planters to add greenery without taking up floor space. This draws the eye upward and creates the illusion of height.
- Wall-Mounted Shelves: Use wall-mounted shelves to display plants, lanterns, or decorative items. This keeps the ground clear and adds visual interest at different levels.
3. Incorporate Light Colors
- Light-Colored Furniture: Choose light-colored furniture and decor to make the space feel airy and open. Whites, pastels, and light grays reflect more light and help the area appear larger.
- Bright Textiles: Use bright and light-colored cushions, rugs, and throws to add warmth and vibrancy without making the space feel cramped.
4. Create Defined Zones
- Rugs and Mats: Use outdoor rugs or mats to define different zones within your patio. This helps organize the space and makes it feel more structured and spacious.
- Planters and Screens: Use planters or decorative screens to create separation between different areas, such as a seating area and a dining space. This adds functionality without cluttering.
5. Add Mirrors
- Reflective Surfaces: Incorporate mirrors or reflective surfaces to give the illusion of a larger space. Position mirrors to reflect greenery or open sky for an expanded view.
- Mirrored Furniture: Use mirrored or metallic furniture pieces to enhance light and create a sense of depth.
6. Maximize Lighting
- String Lights: Hang string lights across your patio to create a warm and inviting atmosphere. They add a cozy ambiance and visually expand the space.
- Solar Lights: Use solar-powered lights along pathways or in planters to illuminate the area without taking up space. These lights are energy-efficient and easy to install.
7. Declutter and Simplify
- Minimal Decor: Keep decor minimal and avoid overcrowding the space with too many items. Choose a few statement pieces that add personality without overwhelming the area.
- Hidden Storage: Use furniture with hidden storage compartments to keep the patio tidy. Benches with storage, storage ottomans, and wall-mounted cabinets are practical choices.
8. Incorporate Nature
- Greenery: Add plants to your patio to create a natural and inviting environment. Use a mix of potted plants, hanging plants, and vertical gardens to add depth and texture.
- Natural Materials: Use natural materials like wood, stone, and wicker to add warmth and blend your patio with the surrounding landscape.
9. Optimize Layout
- Angled Placement: Arrange furniture at an angle to create a more dynamic and spacious layout. This breaks up the grid pattern and makes the space feel less confined.
- Clear Pathways: Ensure there are clear pathways for movement. Avoid placing furniture in a way that obstructs the flow of traffic.
10. Personal Touches
- Custom Decor: Add personal touches like custom-made cushions, DIY planters, or handmade art. Personalized decor makes the space feel more inviting and uniquely yours.
- Outdoor Art: Hang outdoor-friendly art or decor on walls to add character and interest without taking up floor space.
Making a small patio look more spacious and inviting is all about smart design choices and creative use of space. By incorporating these tips, you can transform your small patio into a charming and functional outdoor retreat.
So, if you’re wondering, “How can I make a small patio look more spacious and inviting?”, these strategies provide a comprehensive guide to maximizing your outdoor area. Enjoy a beautifully designed patio that feels open, welcoming, and perfect for relaxation!
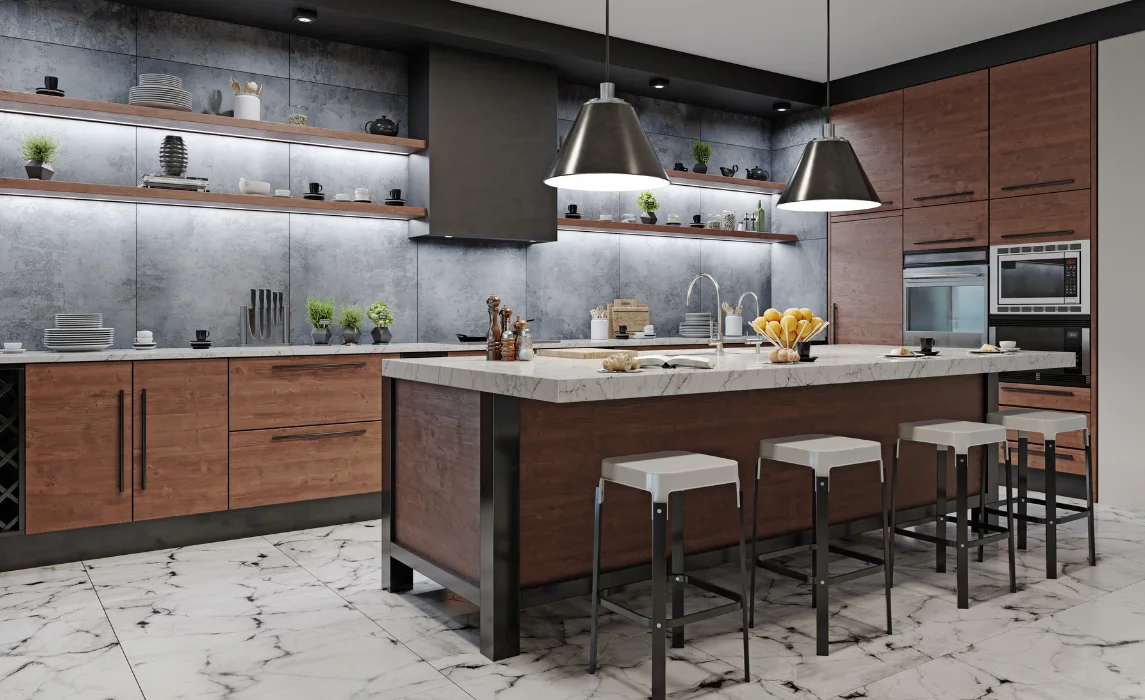
Choosing the right size for your kitchen island is a crucial step in designing an efficient and stunning kitchen space. The size of the island will impact not only the functionality but also the overall layout of your kitchen. For a built-in kitchen island, the minimum recommended size is four feet by two feet, with 36 to 42 inches of clearance around it. This ensures enough space for easy movement and accessibility to other kitchen areas.
When thinking about the best size for your kitchen island, consider how you plan to use it. Will it be for meal prep, dining, or extra storage? The island's size should suit your needs without overwhelming the room. You can experiment with different dimensions by placing a small table in the intended space to see how it feels.
Clearance and seating are also vital factors to think about. Allow enough room for comfortable seating and movement, especially if you want to integrate appliances into the island. This balances functionality and comfort, making your kitchen island an integral part of your kitchen remodel.
Key Takeaways
- Minimum island size is 4 feet by 2 feet.
- Consider the island's purpose when choosing its size.
- Ensure adequate clearance around the island.
Kitchen Island Size: How To Choose The Right One

Choosing the right kitchen island size can help make your kitchen more functional and stylish. One rule of thumb is to aim for an island that is about one-third the length of your kitchen. This ensures enough space for both movement and work areas.
Consider the total kitchen area first. If your kitchen is small, a 2'x4' island is recommended. In a medium-sized kitchen, a 3'x5' island works well. For large kitchens, go for a 4'x7' island.
If you plan to have seating, ensure the island is at least 36 inches wide, including the overhang. Allow at least 3 feet of space between the island and other furniture to maintain a comfortable layout.
A good way to decide is by measuring the kitchen from wall to wall. Keep the island size within 10% of the total square footage of the kitchen. This keeps the island proportional and useful.
Before making a decision, think about what features you need. Do you need extra storage? More counter space for cooking? Use this to guide your selection of the right kitchen island size for you.
What Is A Good Size For A Kitchen Island?

A kitchen island can add both style and function to your space. When deciding on the size, consider your kitchen's layout and available space.
A standard kitchen island size is typically 2 feet by 4 feet, but this varies.
Your island should offer enough space for food prep and storage. A good rule is to leave 36 to 42 inches of clearance around it. This ensures easy movement and accessibility.
If you plan to use the island for seating, make it at least 36 inches wide, including an overhang for comfort.
A helpful guide is to keep the island about one-third the length of your kitchen.
For countertop thickness, consider the following overhang recommendations:
- 12 mm thick: 200 mm overhang
- 20 mm thick: 250 mm overhang
- 30 mm thick: 300 mm overhang
By following these tips, you can create a helpful and comfortable kitchen island.
What Is The Ideal Spacing For A Kitchen Island?

Planning the ideal spacing around your kitchen island is crucial for a smooth cooking experience. A good rule is to have at least 36 to 42 inches of clearance around all sides of the island. This space allows for easy movement and helps with traffic flow.
For kitchens with multiple cooks, consider increasing the clearance to 48 inches. This extra space can prevent bottlenecks and make it easier for everyone to move around.
If your kitchen includes a seating area on the island, ensure the overhang allows guests to sit comfortably. Typically, a depth of about 15 inches is effective for seating areas.
Think about the kitchen triangle, which connects the stove, sink, and refrigerator. Make sure your island does not block this triangular path to maintain efficiency. The kitchen triangle should make it easy to move between these key areas without any obstacles.
In smaller kitchens, it's important to keep the size of the island proportional to the available space. A compact island with reduced storage or seating can still be functional without overcrowding the room.
By planning the spacing thoughtfully, you can create a kitchen layout that is both functional and inviting.
Key Guidelines For Kitchen Islands

Size Matters
When planning your kitchen island, consider the size of your kitchen. A small kitchen may suit a 2x4 feet island, while a larger kitchen can accommodate a 4x7 feet island. Make sure there's at least 36 to 42 inches of clearance around the island for movement.
Functionality First
Decide the main purpose of your kitchen island. If you need extra seating, aim for an island that's at least 36 inches wide. For cooking or meal prep, ensure there's space for appliances and a durable work surface.
Built-In Versus Mobile
A built-in kitchen island provides a permanent and sturdy option, often with plumbing and electrical access. Alternatively, a kitchen cart offers flexibility. It's portable, allowing you to reconfigure your space as needed.
Appliance Layout
Think about the placement of existing appliances when designing your island. You can integrate a sink or cooktop into your island, depending on the layout of your kitchen and your needs. This can enhance efficiency and workflow.
Consult a Kitchen Design Professional
Working with a kitchen design professional can be invaluable. They can help optimize your island's placement and function, ensuring it complements your kitchen's style and meets your specific needs.
You May Also Like: Tablecloth Sizes Guide: How to Find the Perfect Fit for Your Table
What Is The Best Seat Height For A Kitchen Island?

When choosing the best seat height for a kitchen island, consider the overall height of the island itself. A standard kitchen island height is about 36 inches. This works well with regular kitchen chairs.
If your island is used as a breakfast bar, you should aim for 42 inches. This height fits bar stools comfortably and gives you the feeling of sitting at a high-top counter.
Here's a simple guide:
- 36-inch island height: Use 24-inch seats
- 42-inch breakfast bar height: Use 30-inch stools
Remember, the space between the seat and the top of the counter should be between 9 to 13 inches. This ensures you and your guests have enough room to sit comfortably without bumping knees.
Consider allowing at least 24 inches per person for seating space. This lets everyone sit and move easily around the island, especially if it's used for meals or larger gatherings.
Choosing the right seat height depends on how your kitchen island is used most of the time, so consider both function and comfort.
You May Also Like: How Tall Are Doors: Uncovering Standard Sizes
Frequently Asked Questions
When planning a kitchen island, consider factors like seating space, ideal size, and clearance space. Having the right overhang can make seating comfortable, even in smaller kitchens.
What are the standard dimensions for a kitchen island with seating?
A kitchen island with seating should be about 36 inches wide, including the overhang. This width allows enough space for stools and comfortable sitting.
How do you calculate the ideal size for a kitchen island?
To calculate the ideal island size, take into account your kitchen's total area. The island should take up no more than 10% of the kitchen's total space. This ensures it fits well without crowding.
What is the minimum space required between a kitchen island and other counters?
There should be at least 36 inches of space between the island and any other counters. This clearance allows people to walk and move around easily, enhancing both safety and convenience.
Can a kitchen island be accommodated in a small-sized kitchen?
Yes, a kitchen island can be added to a small kitchen. The key is to ensure it fits without making the space cramped. Choosing a modest size helps maintain flow and accessibility.
How much overhang should be factored in for comfortable seating at a kitchen island?
The overhang should be approximately 15 inches for comfortable seating. This allows people to sit properly without their knees hitting the island.
What is the recommended kitchen island size for accommodating multiple stools?
If you want to use multiple stools, ensure at least 28 inches of width per stool at the island. This spacing gives each person enough room to sit comfortably without feeling crowded.
You May Also Like: Garage Door Size Chart: Standard Sizes Explained